
Okay…here it is…the most awesome diaper bag/changing station ever. Looking around on Pinterest, I got ideas from a bunch of bags that I came across to make my perfect bag. It took me a few times to perfect it, and a lot of cursing and screaming at both the bag and my sewing machine trial and error, but I love this bag!! I’m going to start by warning you….there’s A LOTTTTT to make this bag, so before cutting, pinning and sewing, make sure that you look at all the pictures and read the directions very carefully!!! If you find anything confusing, PLEASE ask! I’d much rather clear something up, than have someone waste fabric or give up trying to make it! Also….don’t be crazy like me and try to do it in one day…your back will hurt, your brain will hurt, and you’ll be a miserable, miserable lady. Try cutting out all your pieces one day, sew on zippers, pockets, and bindings another, work on the outside, and then sew the pockets to the inside and then finally sew it all together to finish it up. Trust me when I say this way makes you stay sane!
**I will say, this bag is not for someone learning to sew, or at a beginner level. If you are, and still really want to make it, recruit some sewers with experience to help!**
It all started with this pattern that I came up with. Look at this thing! A hundred pieces of paper taped together, measurements marked, crossed out, arrows all over the place. I don’t even know how my brain makes these things, I swear. But I’m so glad it did because It was such a help! You won’t need this pattern, as I’m giving you all the measurements you need, and directions on what to do, but I just wanted to share 🙂
Here are your fabric types, and measurements you’ll need. I purchase 1 yard of both the outer and inner fabric, 1 yard of inner pocket fabric, 1 yard strap fabric, 1/4 yard plastic, 1 yard fusible interfacing, and 1/2 yard non fusible interfacing. I also use coupons like nobody’s business and go around to all the craft stores so I can get the best deals. The last time I made this bag, it came to less than $40. Bags like this go over $100 or even $200! So if you have a little lot of patience, and time, this bag is totally the way to go.
Starting with the outside of the bag, we’re going to sew seams going along the length and width to make it easier to fold closed. The center of your bag is 15in x 3in. I marked in red where you will sew your seams. Mark with chalk, then fold and sew VERY close to the edge. I’m talking between 1/16 and 1/8 of an inch. They’re really only there to make the folding easier, you don’t want to be able to see them too much.
Once that’s done, we start on the straps. If there’s a right and wrong side to your fabric, you want to fold the fabric over right sides together and sew closed. You’ll be doing this with ALL 6 pieces. Then, turn them rightside out. The 4 shorter pieces can be set aside for later and the longer straps will have the duck canvas pulled through. The duck canvas is to give it a little stability. You could very well use a light interfacing, I just had left over duck canvas and wanted to save money. It won’t go to the very ends of the straps, you’ll have to figure out the center. There’s about 1/2in of no duck canvas on both sides. After it’s in there nice and flat (make sure your seams are evenly along the edges and not all over the place), you’re going to sew both edges down to secure the canvas to the straps. I sewed about 1/8in from the edges. 
Once all the strap pieces are done, it’s time to get them onto the outer part of the bag. Measure 2in from the seam you sewed earlier (this is within the 15in middle section, which is the front and back of the bag). You want to pin the straps the opposite way (going towards the middle of the bag), and sew as close to the folded seam as possible. Then, you flip them over towards the top of the bag and it will cover the seams. (It’s hard to explain, so take a good look at the picture and play around with the straps before sewing them). I added a pocket, though it’s optional. I only added it to the one side, that way you can still see a lot of the (beautiful) print from the other side! I did it the same way as the straps, sewing it down the opposite side, so I can flip it over the seam. Center the pocket under the straps, pin down (making sure they’re evenly 2in from the side seam going all the way up), and sew along both of the edges. Make sure you sew them 1/8in from the edge like you did the longer part of the strap so the seams will match up!
Now to finish up with the straps, you’re going to take the longer pieces and pin the opposite way (just like the base of the straps and pocket), so, once again, you can then flip it over the seams. Sew them down where I marked red. You could do a crisscross along the two seams, or you can leave it like that.
Now that the outside is all done, you can fold it up and get an idea of what your beautiful bag will look like!!!
Now we’re going to move to the inner part of the bag. I can’t say which is easier, because they’re both annoying, time consuming, and tedious! But, you’re halfway there, and just think of how proud you’ll be when you’re all done 🙂 **Note, if you want to add more zippered sections you’ll have to have a longer length of fabric, since you cut and fold 1/4in to install the zippers. Pretty much add 1/2in of fabric per zipper. I added one zipper to both sides. This one, at the top, and the other, towards the middle (but not where the bag will be folded).
For the plastic pockets and the two fabric pockets, I had the openings all facing towards the top and bottom edges of the fabric. This will make it easier for when the bag is all folded and closed on your arm, and you’ve got a baby in your other arm and you just need to grab something quickly, all you’ll have to do is pop the snaps open and take what you need. The first bag I made, I had some of the pockets opening towards the center…I quickly realized that was a no-no! **Notice how the fabric pocket is sewn the way the straps and outer pocket was–opposite side, so you can flip it over the seam!** Also, I realized I didn’t show a picture tutorial, on what I did with the fabric for the pockets. I took the 11in x 12in fabric, folded it in half (wrong sides together) to make it 11in x 6in, and sewed a seam towards the fold to make it look neat (or if you have enough binding, you could cover the edge with that). I didn’t care too much that the bottom was unfinished since the raw edge will be all the way at the bottom of the pockets, but if you do, you could always sew that closed before you sew it down onto the fabric.
Okay–getting there!! The pockets are all done, and just need to be sewn onto the inner fabric! You want to center the side pockets evenly along the ends. You need to have 1/2in of room around all the edges when you sew both sides together, so have them be 1in from the sides and approx. 1in from the top and bottom.
Time to get your closure flaps sewn and snapped up! I applied the snaps 1in from the top, and 2in from the sides. Once the interfacing pieces are cut, I stick two in each flap to make them extra stable. I use the thickest interfacing the store has. This one was 72, though, I’ve also gotten 80 before.
Ahhh finally….sewing it all together. Pin both sides together, and sew 1/2in all the way around (though leave a wide enough opening on one of the sides for you to turn it through). The closure flaps should be centered between the 15in center. You DON’T want to sew through the interfacing, but instead close up to it. The first time I sewed through it, I realized they would stand up straight and had no ability to bend.
Once it’s turned through, you want to get your snaps on (you’ll have to go through the opening you left). I used a medium hand towel to go in the center as one: no more sewing, two: nice and plush, and three: easy to wash. Though be my guest and make them with some plush fabric instead if you still have the energy after making the bag want. Whichever you choose, you’ll have to figure out how far apart the snaps should be. I put mine 12in apart. My towel was 15in and I think a little bigger than normal, so I’d rather have the snaps closer together that way if I get another towel and it’s a bit smaller than the other one, I know it will still fit.
The snaps should come with directions, but I just wanted to give you an idea of how I did them. They’re super easy, it’s just about cutting a small hole, putting the snap through the bottom, laying the top part over it, and hammering it together.
This part’s annoying, but necessary. I don’t like to cut the interfacing for the inside of the bag until I get to this point just so I know it will fit perfectly. You basically want it in three pieces, the front side, the back side, and the center. they should all be 15in in length, but put it up to the bag (where you sewed the seams to make it easier to fold) and measure it from there. You want it to fit perfectly within all those seams! Once you have them cut, put them in the opening you left, get them into position, and iron each one down. When they’re all in the correct position, give the whole bag a good ironing (be careful with the plastic!!!!) to make sure they’re secured to both the outer and inner fabric. FINALLYYYYYYY, when you’re done with that, pin and sew that opening closed, and guess what?? You’re all done! Fold up your bag, and take a good look at it! As you can see, I made a little zippered pouch with the leftover fabric. I can’t say it enough, I LOVE this bag. **Note, this was the second bag I made, and still found a few flaws in it. The biggest flaw was, the pockets could have been wider (which is why I suggest having them 11in wide rather than the 9in I did for this one). By the third bag, I had it down perfectly. Which is why I waited till then to have this tutorial! **Again, if you notice ANYTHING missing, or if anything’s off, PLEASE let me know so I can fix it!!**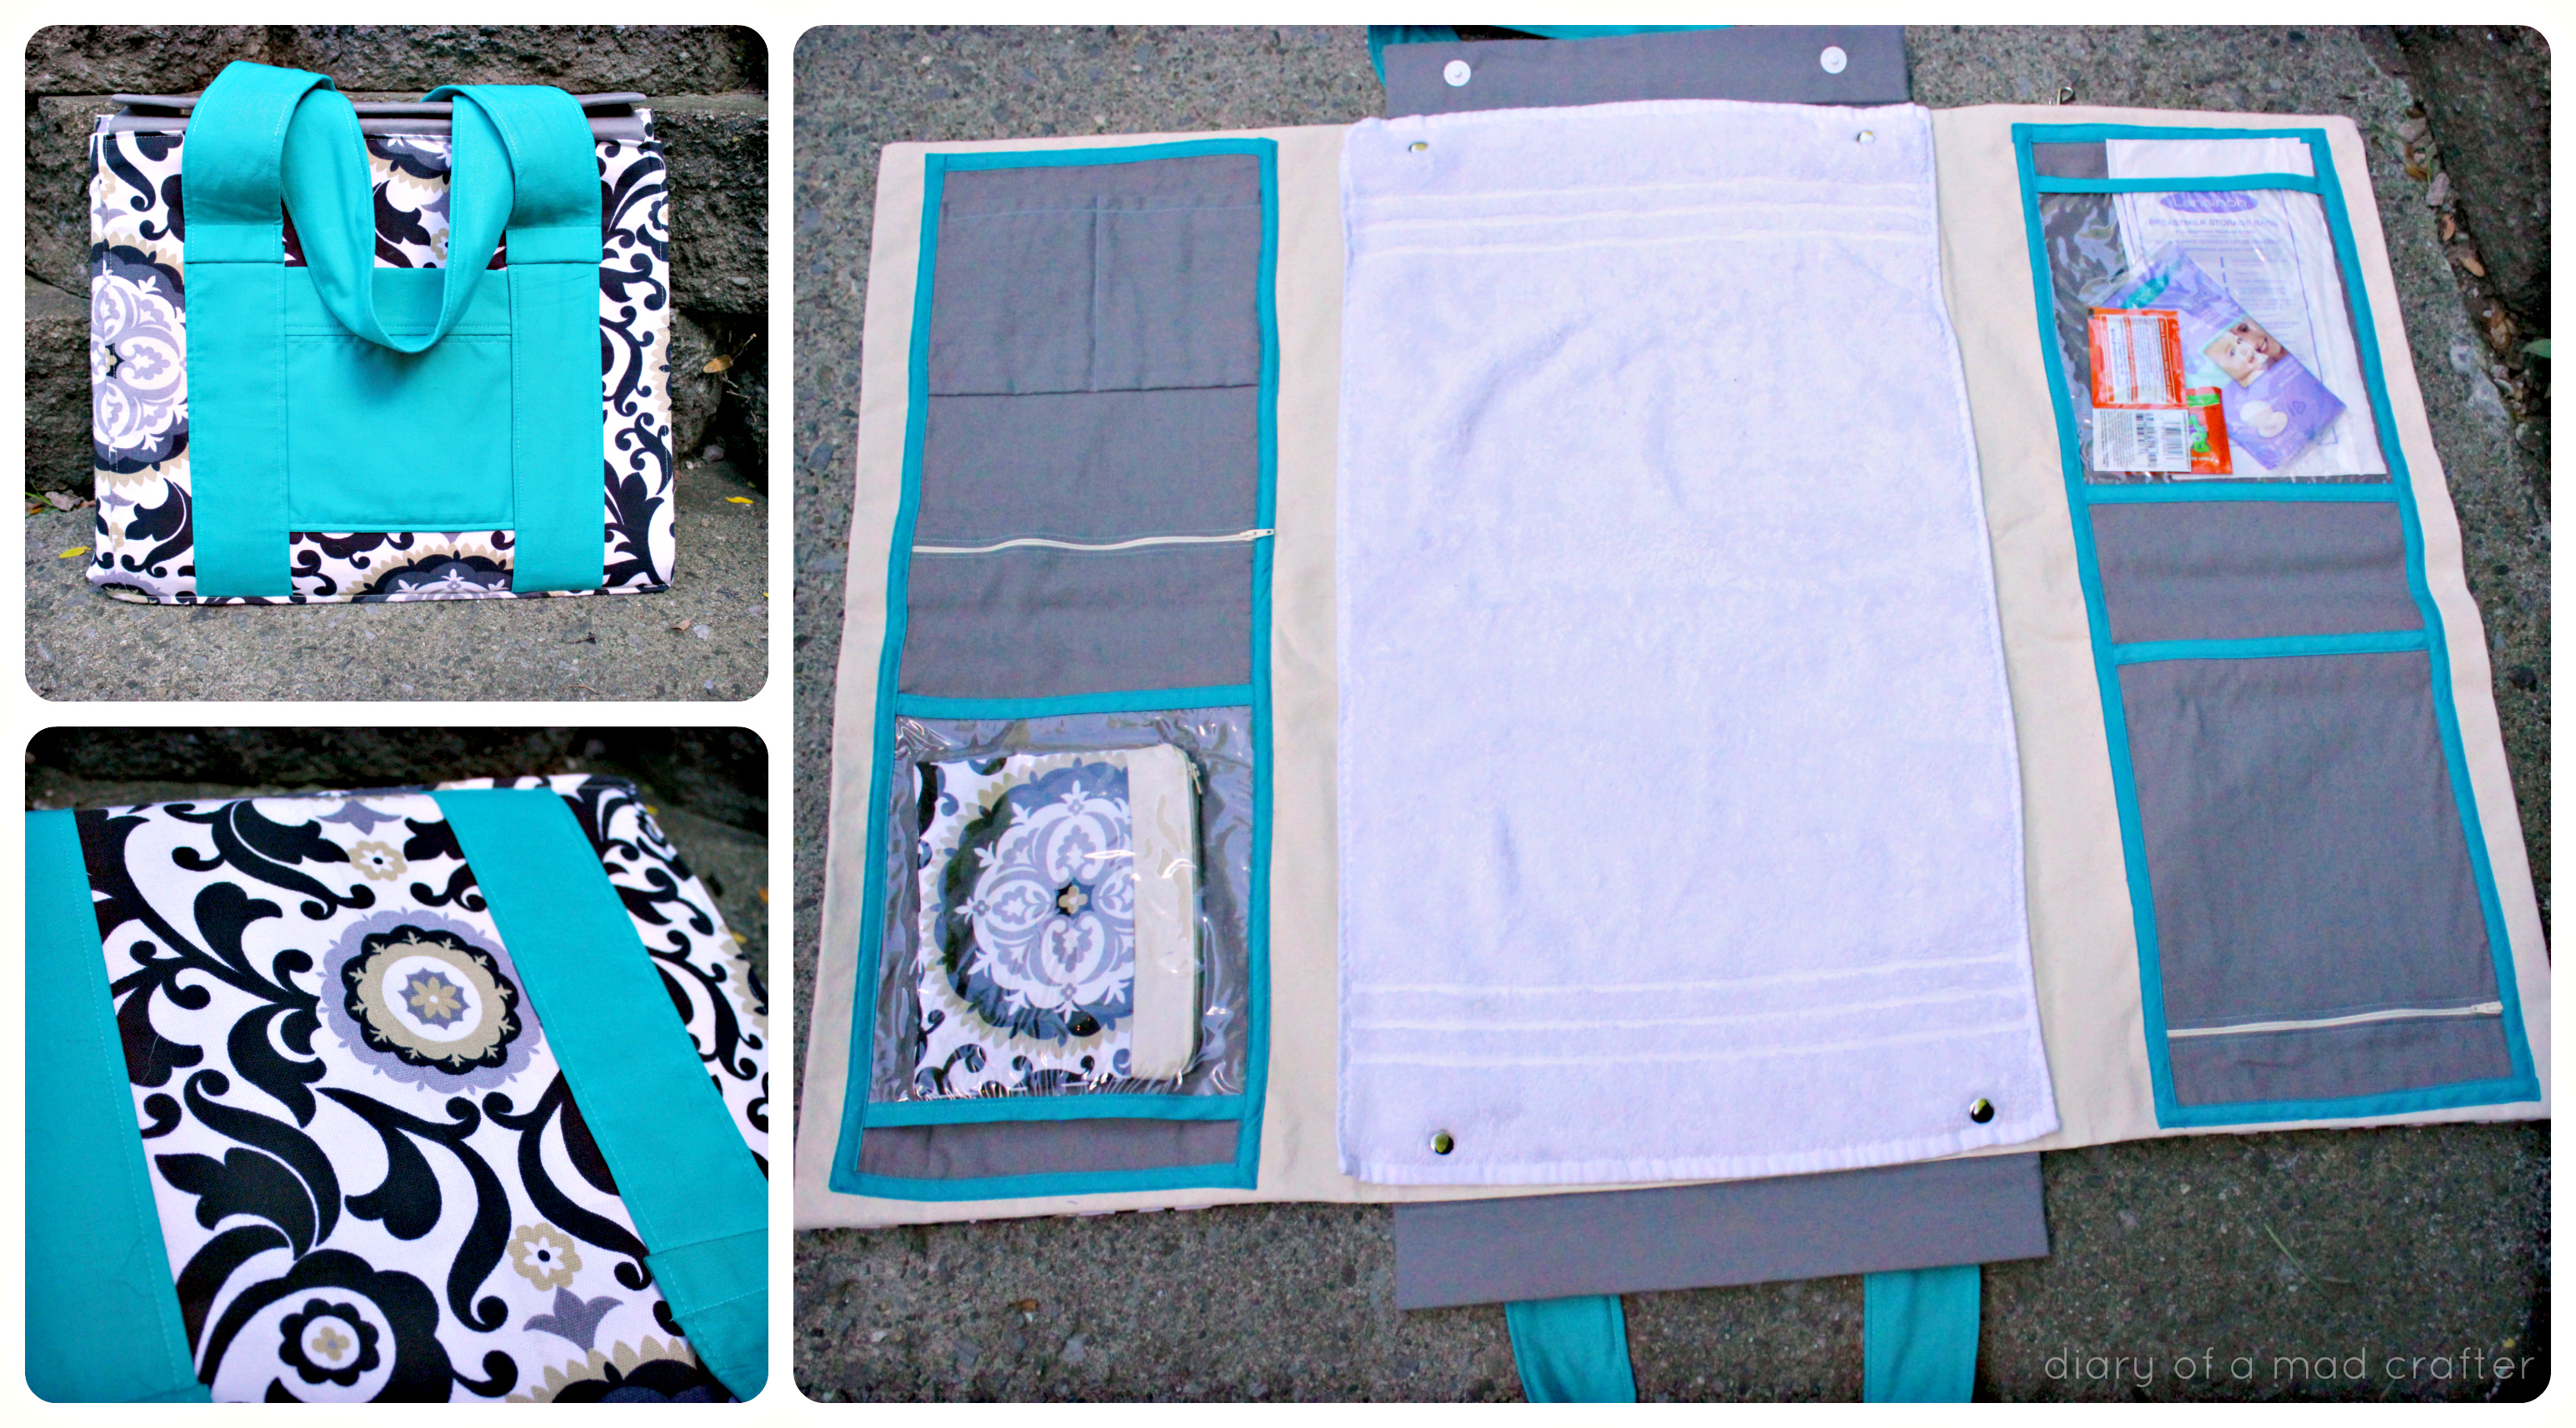
Here’s the third bag I made for a friend to give as a gift (same outer fabric, but a dark purple rather than the turquoise). Notice the bigger pockets (which lets face it, when it comes to a diaper bag, bigger pockets are definitely a plus!)
Don’t forget to follow me on Facebook!! Check it out if you want to see updates on what I’m working on, or whether or not I’ll post that day!
**Have a project you made using one of my tutorials? Show it off! I, along with all my followers, would love to see it! I have a page on my blog called “Your Pictures!”, located right next to the “About This Blog!” link at the top of my blog. check it out for more information, and to see other fan pics!**


Wow! This definitely looks detailed! Great job! I love that it doubles as a changing pad! Very cool! 🙂
~Jen
Yeah…detailed is an understatement lol…part of the reason it took me so long to post was because I was a little overwhelmed with all the measurements and instructions it all entailed!! lol Thanks for checking it out! I can’t wait to use it 🙂
Reblogged this on Something to Ponder About and commented:
It would take effort but I think it is a great bag. Very natty!
Oh my goodness you are soooo incredibly clever!! Amazing DIY 🙂 and biggest congrats on the little one!! Xx
Thanks so much!! 🙂
Great bag! I do love the fabric you used also
Thanks! Yeah, I loveeee this fabric….and it’s funny because when my friend was picking out the fabric for the bag I was making her she picked that one, I said you realize that’s the one I made mine with right?! Lol it’s a great design!
Amazing job! You are going to be super mom!
Aww thanks so much! 🙂
Reblogged this on Atiqahismiling. and commented:
Have you seen this? This is amazing. I don’t have a baby. Probably not in even, in the next 5 years. Who knows. But of course, I am not going to start freaking myself out by going on writing about when or how I will conceive, and consequently give birth to a child. So regardless; I am definitely going to try this out one day.
This is so cool! I’m hopefully exiting the diaper stage of mommyhood, but I love it nonetheless! One tip? I finally bought a KAM press for cloth diapering and they seem much easier to install plastic snaps than the metal ones you show. You might get a kick of of trying the KAMs. I’m so excited I found your blog, though. really neat stuff!!!
I want that plastic snap thing! It’s definitely on my list of things to buy! Do you think it would go through towels though? I thought it was more for thinner fabrics. Thanks for commenting! 🙂
Oooooh I just looked up the KAM press! I was thinking of something different–I need me one of those! They look awesome
I’ve (almost) finished this bag – with help from my very experienced mum and a lot of cursing and blood! We found the outer instructions easy to follow, but the inner ones really quite tricky, so made it up as we went along! A few changes we made:
1) The creases that go along the bottom of the bag on the outer, I sewed the seam on the wrong side on the side flaps and the right side on the middle, so it would be easier to fold when all folded up.
2) Used vinyl for the center inner and canvas for the flaps – wipe clean, and also allowed seams to help it fold again (although lining the inner and outer seams up was… fun…
3) Lined all the pockets with vinyl for water proofing. Great fun sewing binding on when you have 6 layers of material (binding – canvas – vinyl – vinyl – canvas – binding!) but it looks good.
4) Top stitching around the outside for crispness (especially as you can’t iron vinyl!)
5) Velcro to attach the towel and the closing flap
6) Side closures (same as the closing flap) if we get round to it!
7) Did 2 rows of stitching on the binding – one to do the majority of the holding bits together, the 2nd to attach the pockets to the large back piece of canvas.
It’s looking rather nice and as it’s in black, hunter green and cream, even my husband will use it. 🙂 I’ll send a photo in once my mum’s done the top stitching (it’s very unwieldy to sew at this point and my stitching isn’t entirely straight!) and it’s all finished with towel. 🙂
I CANNOT wait to see your bag!! I wish I would have thought to put vinyl on the inside and curse myself for not thinking of it while I was making it!! Though–and it seems like you get this!!–there was a lottt of other cursing going on for just about every other step in making it lol. And then after all that, I have yet to wear it! Though, I haven’t really left the house too much since having him hahah Definitely send a picture!
Awesome diaper bag/baby changing station! Thanks for the tutorial! I just made a tutorial for a messenger style diaper bag. Come see it at http://www.happymamatales.com/diaper-bag-tutorial/
I made a few of these for baby gifts several years ago, and it was such a headache! I wish I would’ve waited for your tutorial and measurements.. this style bag made my head hurt: even more frustrating was attaching the vinyl pockets, the foot kept sticking no matter what trick I tried!
looks fantastic!
Oh these bags were a headache too! LOL Trust me! even with the pattern and measurements they were not fun making! Haha But nevertheless, they are awesome!
So we fold both pocketful sides toward the centre towel, then fold it in half and have something between a bag and a book with handles on the open edge? I’m just trying to make sure I understand how it works.
Hello! You fold the sides toward the center on top of each other and then fold that in half to close the bag 🙂
Madcrafter….this is beautiful 🙂 I’m mainly a bear maker, though made a few bags in the past and been thinking I must make something this for my cousin who has a wee one due fairly soon. Probably being quite daft, but I’ve read your instructions a few times over – your non fusible interfacing – is that just to reinforce areas where you’ve got your snaps, etc?
I’ve got some iron-on vinyl kicking around from a past project, and some very cute baby-style flanellette … trying to sew with it again probably makes me a masochist, but hopefully the finished product will be worth it 🙂
Hello! So exciting for your cousin! So, I actually use fusible interfacing to well give the bag more stiffness and so it holds it’s shape when folded up and closes. The first time I made the bag I did I without and it just warped and didn’t hold up nicely. The interfacing helped tremendously! It’s actually the last thing that I do on the bag and there’s no sewing required over it! I put them into place and then iron the whole thing and then see the opening on the edge (where I put the interfacing in) closed. Hope that helps! The instructions can def e a little confusing as it was a really intricate bag to make so if you have any more questions let me know!
Thank you 🙂 Yes, makes sense I think! I have some fusible batting I thought I’d use – it’s somewhere between a heavy interfacing and light wadding that I’ve used for quilted-style bags…which I figure will mean the bag can be used on any flat surface and still be comfortable for bub. It was just the non-fusible you mentioned that I couldn’t work out, but think I’m right now – and sure I’ll be okay when I get myself into gear and make a pattern to work by…then I’ve got something on paper to adapt as I go if it doesn’t go to plan 😉
Apologies for two comments in quick succession – but in case Myranda checks back – or for the benefit of anyone else who’s had the same issue – I find it’s much easier to sew things like plastic/vinyl/pvc/faux leather/etc. with either a Teflon or even a roller foot on your machine. If you’ve got a low shank snap on/snap off (pretty standard for a lot of newer domestic sewing machines – Singer, Janome at least, I think Elna too) you can pick them up on places like ebay quite cheaply.
Good to know! Thanks! 🙂 BTW– this isn’t in the tutorial, but I definitely recommend putting some pvc in the center where baby lays down just incase they peepee while getting changed!! lol
Almost finished this wonderful bag! I really thank you for this awsom diy _< but I think it's nice even if it's fluffy….. but in less than 2 monthes I will try it with my baby and I'll know if it will be usefull 😀
THANK YOU! 😀
Hello! Is it possible to have the tutorial with measures in cm? And a downloadable pdf? Thank you!
Lisa
Hi Lisa! Unfortunately I don’t have that option and keep meaning to edit the post as once I actually had my son I found that I never used this bag. I know other people who have and liked it but I will say a few of the reasons to think before attempting to spend (A LOTTTT) of time on making it. 1: if out in public, you’d have to put the bag on the floor (yuck) because it wouldn’t be able to comfortably sit on the changing table. 2: even if it were lined with plastic under the towel, little boys pee shoots up like a fountain and could get on other parts of the bag and I wouldn’t recommend washing it in the machine because it could get distorted. 3: you can’t store enough in it that you could grab while holding baby in one hand because you have to open the entire thing up. I honestly felt like it was a great idea in theory but I only used it when I went to family members house that I knew I could lay on their floor and it wasn’t dirty.
What type of fabric did you use for this?
Duck canvas or just regular canvas!