
Although this isn’t a Christmas-y post, it IS going to be a Christmas present. This little stuffed owl will be going to my baby cousin who is so cute I can just eat her up!!! I know she used to have lots of owls in her nursery, and I’m hoping they aren’t gone so this little guy will fit right in! 🙂
I started by making a pattern out of plain paper. I’ve been trying to use fabric that I have (since I have soooo much) instead of buying knew, so I used this pink polka dot fabric. Because it was kind of thin, I wanted to back it up with a thicker fabric. You could use an adhesive interfacing, but since I had the fabric already, I used it instead. If your fabric is thicker, you don’t need to do anything (this is the way to go, because it was kind of annoying to make sure the lining stayed aligned with the fabric while sewing)! I wanted it to be dimensional, so I cut a strip of fabric (which I also lined with the thicker fabric) to go along the sides of the owl. To find out the measurement of this, go along the entire edge of your owl and an extra inch or two. You can always cut some off, but
you don’t want to have to add any, that can get annoying! Last, but definitely not least, cut your mask, eyes, pupils (which I made into little hearts), beak, and belly out of some plain felt (the kind that are 29 cents at Michaels).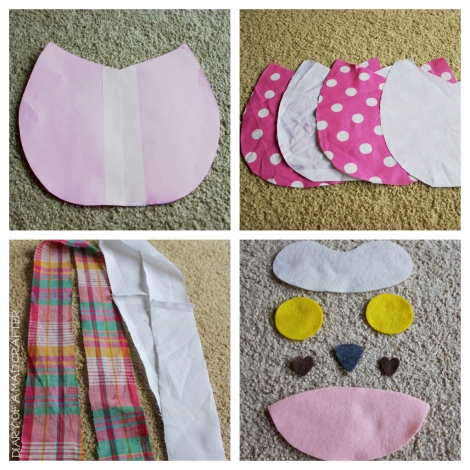
Now to get the sewing started! I started with sewing the pupils onto the eyes (you can glue them down first if it makes it easier). First off, sew VERY slowly!! You don’t want to mess this up, as they’re the most important part of the little guy! Secondly, don’t reverse your stitch at all, just meet the ends together, and then tie the strands together a few times. After the pupils, I sewed the beak onto the mask, then the eyes, and I found it easier to pin the finished mask onto the body before sewing so it didn’t move around. Finally, sew the belly on.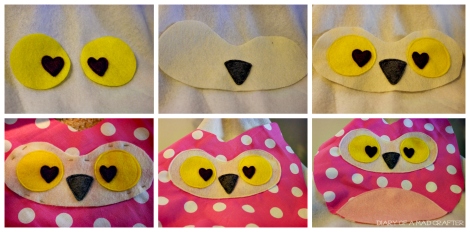
Now here comes the tricky part! Starting at the bottom, I pinned and sewed up to the first ear. It occurred to me that if there wasn’t a seam there, the sides would bow out, and I didn’t want that, so I sewed a seam across the side fabric strip. I then pinned and sewed down the the dip in the middle of the head, and made another seam, and continued to the other ear doing the same. Let me tell you now….it was annoying. It was even more annoying to match it with the backside of the owl, so I’m definitely going to try it again without the seams next time to see if there’s a big difference). After sewing the strip to meet the other side, I sewed it together, and sewed the back to the other side leaving a little opening in the bottom to turn inside out and stuff. Finally, I stuffed it, sewed the opening closed, and massaged the stuffing until it was distributed evenly.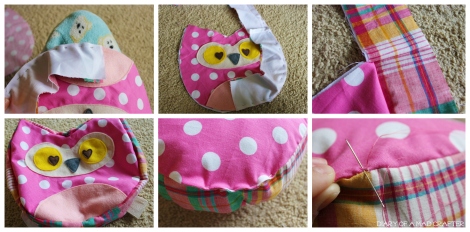
I LOVED the way it came out and can’t wait to make more! 🙂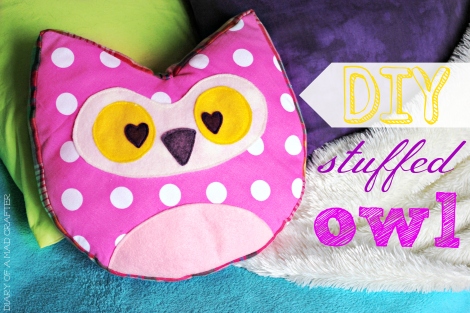
*UPDATE* I made another, without any lining, and only one seam, in the dip on top of the head. There wasn’t too much of a difference. I think it looked fine. It puffs out a little (due to no lining), but if it bothered you enough, you could probably get away with only lining the side fabric and it would be more stable.
Just a reminder, I’m on Facebook!! Follow me if you want to see updates on what I’m working on, or whether or not I’ll post that day!
**Have a project you made using one of my tutorials? Show it off! I, along with all my followers, would love to see it! I have a page on my blog called “Your Pictures!”, located right next to the “About This Blog!” link at the top of my blog. Check it out for more information, and to see other fan pics!**
Until tomorrow!!


ADORABLE!!! 🙂
Thanks!! Can’t wait to make some more 🙂
Very cute!
Thanks! 🙂
I love all the cute owls I see and this one is one of the best!! Your little cousin is one lucky baby!!
Beth
Aww thanks!! 🙂 Make that two cousins! Just made another one for my other adorable baby cousin 🙂
❤ this! It is adorable! Making one for my 5 year old neice for Christmas and one for myself for I love owls. I am following your blog now and perhaps you would like to take a peek at a mine as well. Have a lovely day dear. Your blog is just smashing! Keep up the fine work!xo
Sweet! I hope she likes it 🙂 I’ve been thinking of making one for myself as well as I loooove owls 🙂 btw- I tried sewing it without making the seams AND without lining it, and it came out pretty good! I’m going to post a picture for reference.
How cute!! I love owls 🙂
Me too! My sister and I are obsessed!
Cuuuuute!!
Thanks!! 🙂
Pingback: Christmas Gifts of 2012 | Diary of a Mad Crafter·